Showing posts with label China Glaze. Show all posts

Monday, November 5, 2012

Don't judge a bottle by its glitter

Thank you guys for your entries into the giveaway so far. Remember that it is closing soon so keep those emails coming! I was kind of hoping of drowning in electronic mails.

This was meant to be some Halloween thing but since Australia is a bit of a kill-joy when it comes to American festivities, I decided to tone down the spook factor (until it is non-existent) and celebrate the colour black instead.

To be honest, I've never painted my nails as plain black before. Partly because I have talon-like nails. Glitters all the way!


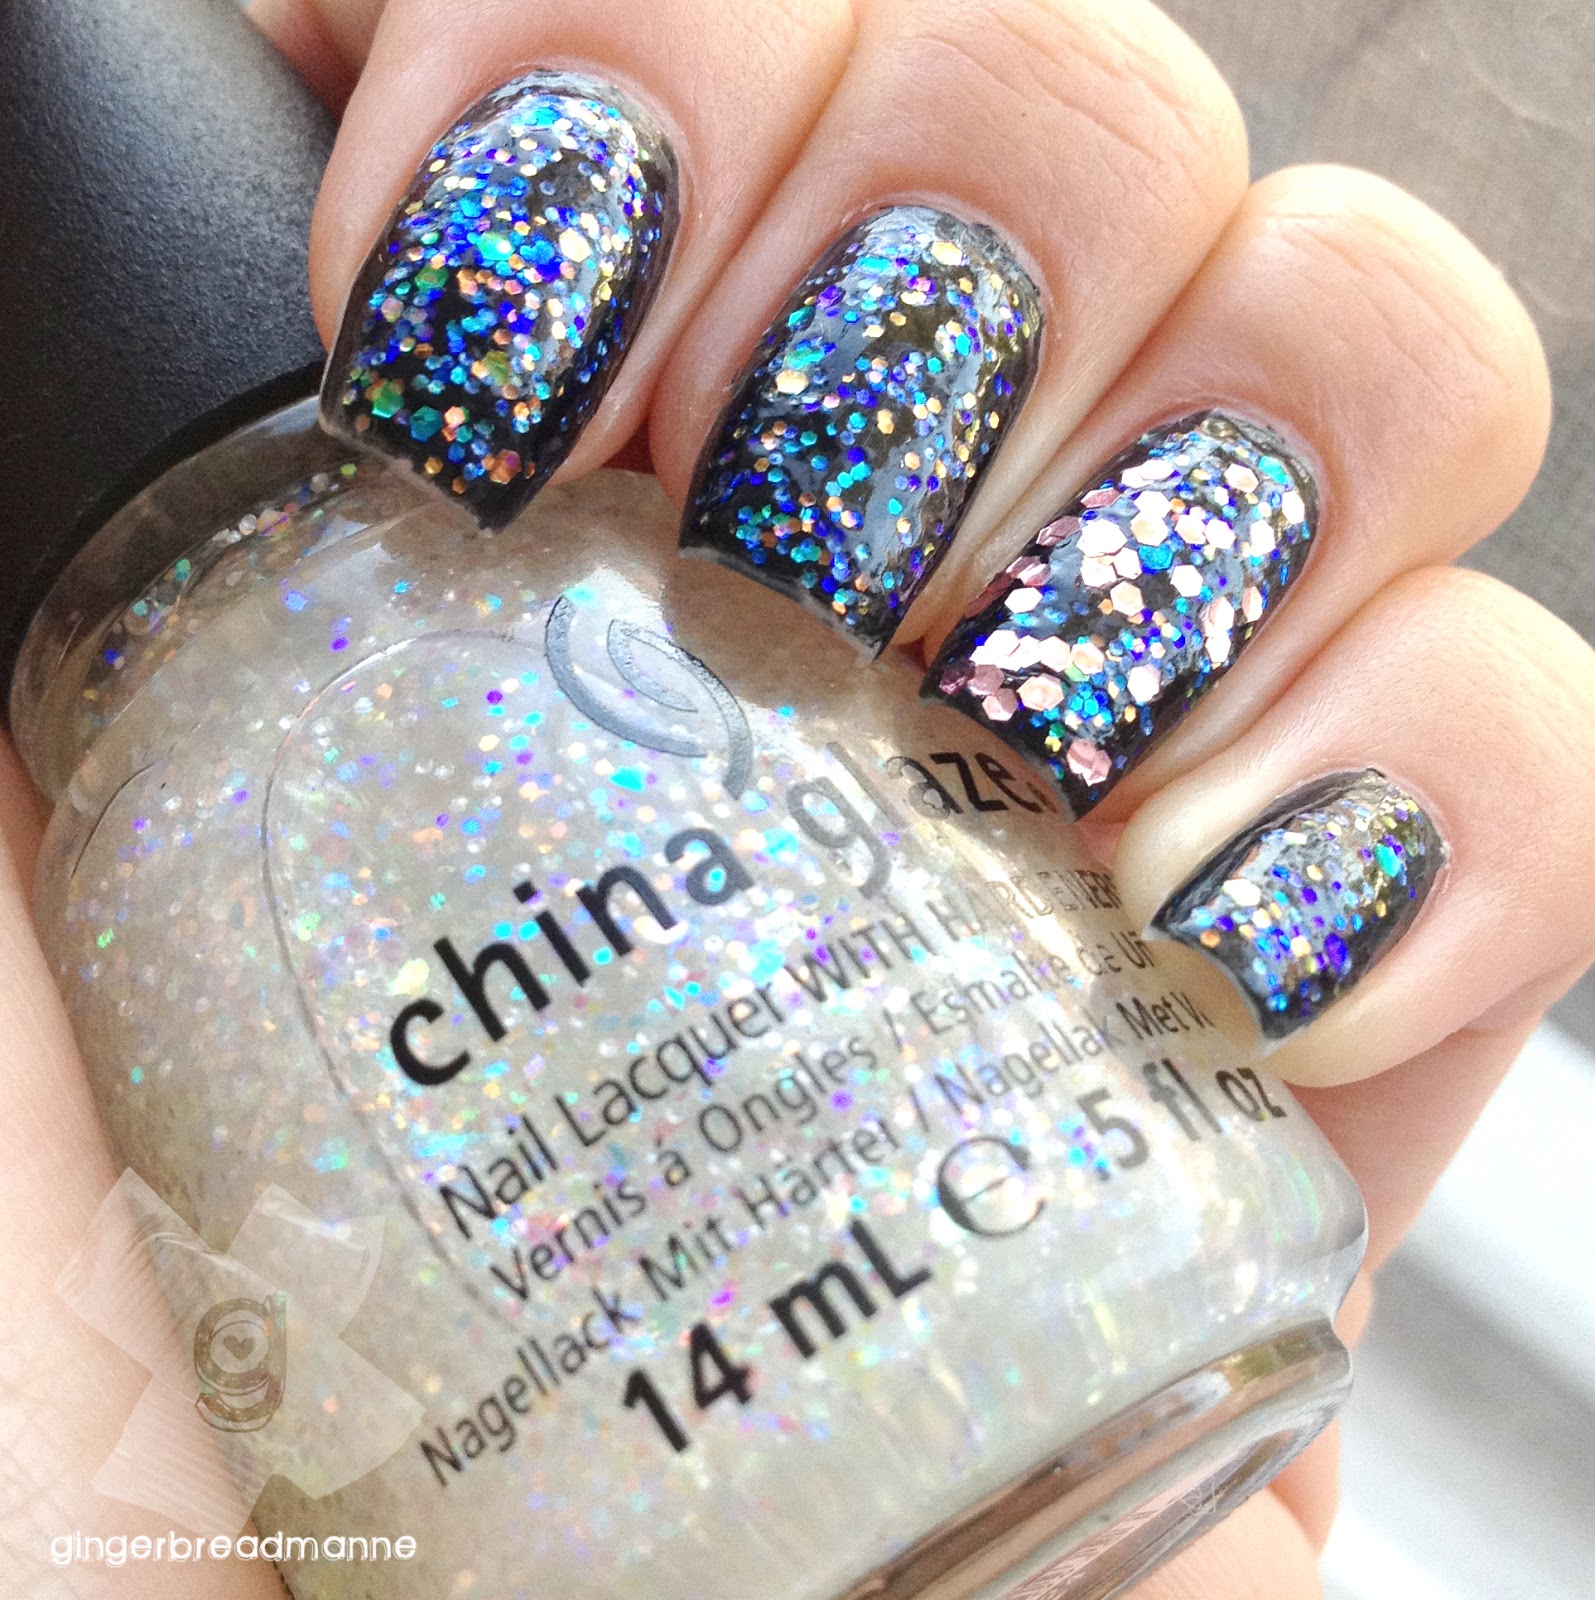
The base is just a plain black. Here comes the trippy part. The bottle I'm holding is China Glaze Snow Globe. The glitters appear all white and pure and innocent in the bottle. I thought I'd be having a winter wonderland crossed with unicorn snot on my nails (which I was in fact looking forward to).


But to my surprise, a very pleasant surprise, the glitters turned into a much darker, almost fluorescent-like glow! I hope that mutated transformation was spooky enough for you folks.

I think I've found my new favourite glitter.

Tuesday, October 18, 2011

Jack ol' pumpkin

With Halloween right around the corner, I thought that I should might as well get into the spirit too with some nail art since I've missed out on last year's festivity.

So I'm kicking off the holiday cheer (alright, I know, it's not a proper holiday) with our good old friend, the jack-o-lantern. I honestly cannot resist making him look all cartoony and adorable. I just want to eat him! I like pumpkins, okay?

I used China Glaze's Sun Worshipper for the base colour of the pumpkins because I absolutely love the bright neon orange (definitely not because it is the only large bottle of orange nail polish that I've got).
Attack of the wrinkly fingers! I hate flash. But it just brings out the brightness of the neon so well. It honestly would not have the same effect in daylight.

What I did was just outlined the shape of the 3/4 pumpkin, added in the stem and the vine leaf, then drew in Jack-O's face with triangle for eyes and a weird saw-toothed smile that is very charming for a pumpkin.

Nooooo, anything but the pumpkins! What Meemee would say if she could talk. Surprisingly, I think my right hand actually turned out a lot better than my left hand. I guess today was my left hand's good day. I very rarely have them. If you are ambidextrous and not clumsily right-handed like I am, then you have no reason not to give these cute little jack-o-lanterns a try this Halloween.

I sound like a commercial.

Sunday, September 4, 2011

Nailling tattoo

The fact that the felt tip pen has not left my hand since the beginning of this semester has gotten me thinking about how I can somehow make that into a nail art tool. I remember a while back, I posted an entry where I had used a biro pen to draw on Essie's Matte About You matte topcoat. A felt tip pen is much inkier and doesn't dig into the nail polish surface, making it an accident-proof nail art pen.

So with the "how" solved, my mind wandered towards Chanel's temporary tattoos. I've always wanted to get my hands on them ever since I had heard about them early last year but common sense prevailed.

Enough of my blabberings, I'm quite excited to share with you what I think is a rather good turn out for a design that is so completely spontaneous, inspired by Chanel.

The base is 5 coats of Zoya's Angella. The polish is one of those sheer pink-tinted iridescent pearls. I personally dislike sheer nail polishes because it justs really troublesome appearance-wise when yucky things get caught underneath my nails like glue (blame my course), food (think rainbow sprinkles) and moisturisers. With an excessive 5 coats, the finish is semi-sheer under certain lights and almost opaque in dimmer environments.

Instead of Essie's topcoat, I decided to try out China Glaze Matte Magic's ability to withstand my crazy squiggles. Rather impressive, actually. I've been rubbing on my nails while exerting quite a bit of force and the drawing is yet to budge.

Here's the basic precedure that I had followed to create this:
1. Basecoat (always always always, I absolutely cannot stress this enough).
2. Base colour (in this case, Zoya Angella).
3. Matte topcoat.
4. Attack your nails with whatever pens and colours you've got handy. I've yet to try it with gel pens.
5. After the pen drawing is dried, seal the design with another layer of matte topcoat, or normal, depending on the finish you're chasing.

To my surprise, the whole process had taken less time than a normal manicure since matte topcoats dry in a flash, even faster than those polishes that claim to "dry with in 60 seconds (liars)". This is so much cheaper than those Chanel tattoos and just as effective, in my opinion.

Monday, March 21, 2011

Diamonds in the air

First up, I'd have to apologising for not posting since over 2 months ago (dear oh dear). As a very bad attempt to justify this uber long period of inactivity, I'd have to blame China because that country has blocked just about everything that is even remotely entertaining. No Youtube, no Twitter, no Tumblr, no Wordpress, no Blogger, no Facebook and just about every other 'social' sites.

Now let's get onto the more important things. I've been feeling very lazy lately. I'm still not used to uni's insane workload. I also had to cut my nails extremely short while I was in China because somehow my nails just kept on breaking, so I don't want to show the world my bald fingers. My nails are now finally at an acceptable length! I had to do something to celebrate, right?

I used 2 coats of China Glaze Light as Air because I haven't gone nail polish shopping in quite a while and I've used up every single colour because I am that deprived oh wow I'm rambling because I am that sad and now how many "because" have I said? So I don't know why but it ended up being kind of streaky. Had my nail painting skills deteriorated? So what better way is there to cover up streakiness than with plenty of glitter (Essie Silver Bullion)?
I couldn't help decorating my ring finger since I haven't done a proper nail art in ages. I regret not doing the whole manicure in it as personally I believe it had turned out pretty darn good. I promise to update again this week so stay tuned!

Monday, January 10, 2011

Strawberry surprise!

This is 10 days late but happy new year to you all. My unspoken new year's resolution of blogging more frequently is an absolute failure. I still paint my nails a lot but I always forget to photograph them and by the time that I do remember, the tips are worn and sometimes even chipped. Nothing's blog-quality these days.

Moving on. I've been wanting to do strawberry nails for quite some time. I had finally gotten around to them last night. I'm pretty happy with how they've turned out, exceeding my expectations, even.
3 coats of Zoya Gilda was used as the base. The sparkly fuschia pink is an amazing shade in its own right. But I was pleasantly surprised when it was coupled with China Glaze Four Leaf Clover for the tip. Four Leaf Clover is one of the hardest colours to photograph. It is a lot greener in real life, leaning towards a forest green. Gold bullions are stuck on to represent the strawberry seeds. Strawberry seeds are yellow. Don't try to argue otherwise because I know I am right. I've been through this with countless people.
The gold bullions feel really funky when I run my fingers over them (in a good way) because they're so bumpy.
I hope I've inspired you to strawberry-fy your hands. Yellow nail polish can be used instead of gold bullions if you find that they are difficult to locate. I've seen small bottles of bullions in Morning Glory. But I get them from Ebay in those wheels. Now I need to get some whipped cream.

Sunday, December 12, 2010

Hello summer

Recently, I've been extremely lazy. Even more so than usual. I'm actually 3 posts behind. I've had China Glaze Sun Worshipper on quite a few weeks ago, when I didn't have internet. I feel guilty that I'm only blogging about it now.

I remember the fluro phase that Sydney went through a couple of years back. I was never a big fan of those blindingly hideous pinks, yellows and greens. I don't know what came over me when I bought this bottle of neon orange from China Glaze's Poolside collection. However, I am glad that I did.

During application, I had quite a shock. The neon polish dries matte! The thin and runny consistency was also a bit of a turn-off. But the end result was more than enough to overcome the sucky application process. This was with around 5-6 coats of China Glaze Sun Worshipper with a layer of top coat as otherwise the nail polish would be matte. Neon just wouldn't be neon if it wasn't shiny and blinding.
I wish my camera would capture the vivid colours of this polish. You'll need to see it in real life to truly fall in love with the neon China Glaze Sun Worshipper.

Friday, October 29, 2010

Head over Lubu Heels

I feel like I should be doing a Halloween nail art because this is the perfect time for cats and pumpkins and more cats. But the fact that I can't celebrate Halloween (this is Australia and HSC is killing creativity) really dampened my spirit. So instead, I've opted for China Glaze Lubu Heels. I know this is pretty old but I am in love with this polish!

China Glaze Lubu Heels is essentially tiny red glitters suspended in a sheer, jelly black base. However, I was able to achieve close-to-opaque with 3 coats while maintaining the squishy jelly-like quality. I absolutely adore jelly-finishes and the red glitter in this polish is a huge bonus.


I'd like to keep this on for a while because it is just so beautifully mesmerizing.

Tuesday, October 26, 2010

The golden age

Since I have over a week until Physics, I'm left with quite a few hours to do nothing. I made these nails for the darling Samantha. Thank you for being my first customer. She had requested them to be Steam Punk inspired. Although these were kind of out of my comfort zone to create, I have to admit that I did have lots of fun making them.

It was a spontaneous process. I didn't have any plans and just whacked things down without really thinking. It was a good way to get over the awful Maths exam, I guess. I love how the little gears look together with the pointed, chrome rhinestones. I also took apart one of my old watches for the clock handles. The aggression was soothing. The acrylic stars that I was making came to good use. I just couldn't resist adding one oversized, statement piece. The fan reminds me so much of Sam.

I used a white base coat. Then a coat of a copper bronze franken that I've made using Revlon's Copperglaze Platinum. 4 coats of OPI Glizterland followed. China Glaze Medallion was added to the thumbs for that extra bit of sparkle dazzle. Nail glue was used to stick down the fan and stars. Topcoat took care of the rest. I think I've used a quarter of a bottle of topcoat for this because I'm a paranoid nut, scared of the rhinestones coming off. Enough of my rambling, check it out for yourself. Caution: lots photos ahead.

All these were completed last night. Oh it was a glorious night spent in front of the television. I've missed my TV so much.

Friday, October 22, 2010

Ski on water

Lately, I've been really sluggish and quite DS-dependent. Yet I manage to squeeze in 6 hours of maths per day (which is agonising). I still don't understand what I'm doing half the time. I don't feel motivated enough to do anything, exemplified by the fact that I only have one hand painted. I also keep dreaming about English. They are all really similar dreams where I'm studying for another English exam but nothing would go into my head and I keep reciting my history and memory essay. Last night was the 4th time that I had that dream. It is quite terrifying.

On a much brighter note, I marbled the nails on my left hand. This was actually the first time that I've marbled straight onto my nails. I've always done it on fake nails because I thought the cleaning up process would be a nightmare if I were to dip my finger into nail polish. But with the help of Vaseline, the whole process was so quick and easy.

I started off with 2 coats of OPI Ski Teal We Drop as base. Then I used various shades of green: China Glaze Four Leaf Clover, a green franken made by mixing China Glaze Sky High-Top with China Glaze Happy Go Lucky, OPI Jade is the New Black, some more OPI Ski Teal We Drop and Zoya Ivanka.
The thumb reminds me of a watermelon. Overall, I think this was rather successful. OPI Ski Teal We Drop is such a gorgeous colour. I especially love how it doesn't make my skin look more yellow than it already is. The white powery thing on my thumb is left over acrylic powder. The moulds that I've ordered off Etsy had arrived so I was making acrylic stars.

I'll definitely make a marbling tutorial soon.

Tuesday, October 19, 2010

I'm still alive

I haven't blogged in quite a while. Yes, I'm still painting my nails during this time. Even though the HSC is a (the word that rhymes with itch), the nail polish fumes are keeping me sane. You should've seen me during the last week of the holidays without nail polish. I'd like to thank the two Shirleys for putting up with my insanity during that agonizing period. I'd also like to thank Vivien for the lovely post, I hope you're painting your nails while you're reading this. This is beginning to sound like one of those award speeches so I am going to stop before I throw up in my mouth.

After the Belonging Paper, I painted my nails. I've reworked the Ruffian moon and made it look more like the "real" thing, whatever that may be. I used 3 coats of Colour Club Worth the Risque as base. This is a holographic nail polish that turns into disco balls in the sun. I love it. Although I failed to capture it because my home only sees the sun during the morning (I'm usually asleep during that time). This will all change when I move in a month's time! I'll be sure to take a photo the next time that I wear it.

After the base colour had dried, I used manicure guides on my middle and ring fingers but free handed the rest with Revlon Black Lingerie, then Essie's Matte About You finishing topcoat. I like the free hand effect better. I'm sure you'd agree.
I don't know if it is Essie's matte topcoat's fault for my own fault for not leaving the black to dry completely before whacking on the topcoat, the matte seems to work better with China Glaze Matte Magic. I should do a comparison later.

Go paint your nails. If my left hand was coordinated enough to free hand a Ruffian moon, then you should have no problem painting both hands.

Tuesday, October 5, 2010

Light bulb

If you've watched Despicable Me, imagine "light bulb" the way Gru said it. I love those light bulb moments. They give me a purpose in life. No, I'm exaggerating. I've obviously been procrastinating a lot during the past few days (if not weeks) and have actually come up with quite a few new nail art ideas. So I thought that I'd better list them before I forget.

Obviously, these are going to be materialised after the HSC. Which is quite soon, actually.
♥ Tiffany & Co inspired (gives me an excuse to get China Glaze For Audrey)
♥ Minnie Mouse (who wouldn't love bows and polka dots?)
♥ Cookie Monster (his crazy googly eyes)
♥ Elmo (na-na-na-na Elmo's World)
♥ Christmas themed (I love Christmas, hopefully I can get my hand's on China Glaze's seasonal collection)
♥ Gingerbread man! (I am so excited for this one)

These will keep me going until next year.
Meemee says bye.

Saturday, October 2, 2010

Bring on the burlesque!

I am so excited! OPI has released its Burlesque collection to celebrate the release of Burlesque the movie. You know, the one with Cher and Christina Aguilera. The movie doesn't look that appealing but OPI's collection of nail polish sure is amazing.

There are so so so many glitters! You should definitely go get out the swatches. Especially of the pure glitter ones. Yes, my wishlist has 2 additions: OPI Shimmer & Shimmer and OPI Sparkle-icious. They're both from the Burlesque collection. If you loved OPI Mad as a Hatter that was released with Tim Burton's movie, then you're going to love this collection. I know, I'm repeating myself. But I am just so excited! I can't wait to get my hands on those babies.

I guess I'll see them after HSC. That is in 6 weeks' time! Because I am so excited, I'll leave you with some photos of my current mani. I call them gold diggers. I promised myself that this will last me until the start of the HSC. Trying to keep this promise will be pure agony. I'm sorry that the first picture is blurry. My camera sucks. This is why I need a DSLR.
3 coats of OPI Glitzerland, 2 coats of China Glaze Gold Medallion on tips
It's like a gradient effect with glitter tips. The larger glitters are extremely reflective. I'm loving it. But it'll be a pain to remove. I'll worry about that later, I guess.

Friday, October 1, 2010

Go-Go Pink vs Mod About You

I should be studying right now. I woke up at 11AM today (wasted 2 hours already) and ended up playing my DS until 3PM. Then I don't know what happened in between 3PM til now. I really ought to be putting a lot more effort into being studious.

But instead, I bring you with a comparison of China Glaze Go-Go Pink with OPI Mod About You. Yes, this one's for you, Troll.

The first thing that I've realised is that they have completely different formulas. Well it is rather obviously since Go-Go Pink is on the sheer side while Mod About You is extremely opaque. The bottles do say a lot.
Left: OPI Mod About You; Right: China Glaze Go-Go Pink
As you can see, MAY has a cool undertone while GGP has a warm undertone. So they're not in the same groups of colour although they are both quite pastel. With 1 coat, GGP is extremely sheer while MAY is already nearly opaque.
1 coat of each
So I kept painting. With 3 coats, GGP is now opaque. MAY only required 2 coats in total. This is taken in the sun. The second photo is taken in shade. The colours look similar in the sun but completely different in shade.
In sun light
In shade
GGP is much warmer than MAY. GGP is almost peachy incomparison. Personally, I prefer MAY because my skin tends to look extremely orange with warm colours. However, the formula for GGP is quite watery for a polish that isn't sheer. It was a lot easier to apply and I did not encounter any problems.

Also, if you're looking for a dupe for MAY, I would suggest China Glaze Something Sweet from the Up & Away collection. I haven't tried it personally but I do think the formula will be less gloggy than MAY so I believe that would be something sweet to look into. Excuse the pun. I couldn't help myself.

Wednesday, September 22, 2010

Ruffian moon manicure tutorial

I've noticed that there is a current trend in "Ruffian Moon" manicures. Creative Nail Design, otherwise known as CND is leading this trend with several variations of this manicure style. I was inspired by these 2 examples:
I do not own this image. Credit to source.
I do not own this image. Credits to source.
So I've decided to create a simple tutorial for creating this stylish look.

If you remember my Channelling Chanel entry, I talked about using french tip guides that can be purchased on Ebay for next to nothing. Well, great news! I've found an even cheaper method that eliminates the shipping time: hole punch reinforcement stickers! They can be found in all news agencies in the stationery section. Now gather them and cut them in half so one ring can be used twice.
Paint your nails a base colour. I wasn't bothered to make the whole thing perfect becase only the bottom of the nails will be seen. I've used 4 coats of Essie Pound Cake at the bottom. It is a light nude that leans towards greige and has a slight pink tinge. I would definitely paint my walls this colour. Looks so refreshing.
As you can see, the tips are not properly painted. This did not affect layering in any way. Apply a quick dry topcoat or wait for as least an hour for the polish to dry properly so that sticking wouldn't ruin the base. Get your semi-ring. Stick it on the palm of your hand to remove the excess stickiness. Stick it onto the bottom of your nail and make sure the semi-ring is stuck firmly to your nail otherwise bleeding will ruin everything.
I applied OPI Dim Sim Plum to the top half of my nail. I got a perfect coverage with 2 coats. I then applied China Glaze Matte Magic Topcoat for an extra twist.
Remove the semi-ring when the top half is almost dried. Check out the final result.
I'm pretty happy with it seeing that this manicure was so quick, easy and cheap to do. Those reinforcement rings would also be perfect manicure guides. Maybe some glitters would spice things up a little more. Go nuts!

Monday, September 20, 2010

5 minutes nail polish removal tutorial

Disclaimer: I am definitely recommending this method. I do not claim this as my own. I learnt it from Deborah Lippmann so I'll recognise her as the original source. However, the true origin of this amazing 5 minutes method is yet to be discovered.


Nail polishes are terrific when you don't need to remove them. It used to take me up to 30 minutes swiping the nail polish off using millions of cotton buds. It was both a waste of time and precious cotton buds that are needed for other great things like making sure my ears are squeaky clean. Too much info?

One bright and sunny day, I was browsing through my favourite nail blog (because I have no life), I came across a Youtube clip of Deborah Lippmann showing her quick and easy way of removing nail polish. That lady is a genius. I tried it at once and it worked so well. I've been using this method for a couple of months now and it has been unbeatable! Except with large chunky glitter like China Glaze Doll's House but maybe it was my fault since I applied 5 coats of the stuff. I've been introducing this amazing method to my friends and they all love it (the ones who tried). So here's a tutorial if you don't yet use this method.

Step one. Gather your equipment. You'd obviously need nail polish remover, I like mine acetone-free. It is purely psychological because as long as you're not consuming acetone, it won't do much harm. You nail polish is actually killing you more than your remover. Now that you've gotten your remover, get some cotton balls. They have to be BALLS. Not buds, not tissues, BALLS. Go out and buy a packet if you don't have any. They are so cheap and will last you forever. I only need 1 ball to remove both of my hands.
Now grab your ball. They're so fluffy. Unravel it into a strip.
It should come apart easily as the ball itself is produced by ravelling a strip like a snail shell.
Split your strip down the middle vertically into 2 strips. I am saving you money!
You can continue to split but I like mine with a little bulk. So now tear them into little pieces that are nail-sized. No need to be neat since this is all going to go into the rubbish bin anyway.
Keep tearing until you have a lot. I usually have 12-15 pieces. 10 for my nails and the others for wiping and cleaning up any bits of nail polish left behind.
Now you have the cotton pieces ready. Get your nail polish remover and pour it into the lid and fill it up like so.
Nice and smelly. Now take one of those cotton pieces (let's call it CP) and dip it into the remover. Don't dunk it in. Just dip in the edge because the remover will travel up the CP. Too much remover on the CP will dribble like crazy when you're pressing the CP onto your nail. It could travel up your hand all the way to your elbow. Happened to me before. Not a pleasant experience.
Press the wet CP onto your nail gently. It should be completely wet and cover your entire nail.
Do the same for all the other fingers. I like to do mine one hand at a time because I need the other hand to wipe the CP off.
Leave them on your nails for 1-2 minutes, give or take. That's the time where the remover is doing its job. This is similar to soaking your nails in remover but a lot less harsh on your skin. You nails will not absorb the remover. Like I said before, your nail polish would've killed your nails more than the remover. Next, grab a new piece of CP and wipe off the wet CP from your nail while pressing down with some force. Put some muscle into it! Do it from your nail bed to your nail tip. This way, your nails will not be damaged.
If you do it correctly, almost everything (if not everything) should come right off your nails.
I only have some polishes remaining on the sides because my thumb is flat, not curved like my nails, so I couldn't apply enough force to wipe the sides. Now repeat this for all the other nails.
This is with only one swipe. My index finger, middle finger and pinky are completely clean in just one swipe! This would've taken forever with cotton buds. Use your remaining CP to do the other hand and clean up any bits that maybe be left on your nails.
In the end, you'd have beautifully clean nails.
I even have a strip of CP left over. So that means I've used less than 1 cotton ball to remove all my nails.
I did time myself and found that I've completed the whole process in under 5 minutes, including the soaking time. So I don't think I'll ever return to the primitive cotton buds method ever again.

Just a few important things before I go:
♥ Never use tissue to remove nail polish. Tissue is actually quite coarse and will damage your nails.
♥ My nails used to peel even when I used cotton buds. With this method, my nails don't peel nor dry out anymore after removal.
♥ Always wipe from nail bed to nail tip. Swiping back and forth and/or in the opposite way will make your nails peel.

Now that it only takes 5 minutes for you to take off your nail polish, maybe you'd change your nails more often. Come on, I dare you.